Skip to content
Material Design 3
Main Navigation
v3
v2
v1

English

简体中文
繁體中文
Español
Français
Русский
Português – Brasil
Deutsch
日本語
한국어
Italiano
Polski
Türkçe
čeština
magyar

English

简体中文
繁體中文
Español
Français
Русский
Português – Brasil
Deutsch
日本語
한국어
Italiano
Polski
Türkçe
čeština
magyar

Appearance

Sidebar Navigation

Foundations

Accessibility

Overview: Principles

Overview: Assistive technology

Designing: Overview

Designing: Color contrast

Designing: Structure

Designing: Flow

Designing: Elements

Writing and text: Best practices

Writing and text: Text truncation

Writing and text: Text resizing

Building for all: User needs

Building for all: Co-design

Content design

Overview

Alt text

Global writing: Overview

Global writing: Word choice

Notifications

Style guide: UX writing best practices

Style guide: Word choice

Style guide: Grammar and punctuation

Customizing Material

Devices

Watches: Overview

Watches: Foundations

Watches: Styles

Watches: Layout

XR

Design: Overview

Design: Interaction

Design: Layout

Design: Accessibility

Components: Overview

Components: App bars

Components: Dialogs

Components: Nav bar

Components: Nav rail

Components: Toolbars

Design tokens: Overview

Design tokens: How to use tokens

Interaction

Gestures

Inputs

Selection

States: Overview

States: State layers

States: Applying states

Layout

Overview: Overview

Overview: Parts of layout

Overview: Adaptive design

Scaffold: Overview

Scaffold: Bars

Scaffold: Rails

Scaffold: Panes

Grids & spacing: Overview

Grids & spacing: Grids

Grids & spacing: Spacing

Grids & spacing: Density

Breakpoints: Overview

Breakpoints: Compact

Breakpoints: Medium

Breakpoints: Expanded

Breakpoints: Large & extra-large

Bidirectionality & RTL

Canonical examples: Overview

Canonical examples: Feed

Canonical examples: List-detail

Canonical examples: Supporting pane

Usability: Overview

Usability: Applying M3 Expressive

Material A-Z

Styles

Color

Color system: Overview

Color system: How the system works

Color roles

Color schemes

Choosing a scheme

Static: Baseline

Static: Custom brand

Dynamic: Choosing a source

Dynamic: User-generated source

Dynamic: Content-based source

Advanced: Overview

Advanced: Apply colors

Advanced: Define new colors

Advanced: Adjust existing colors

Color resources

Elevation: Overview

Elevation: Applying elevation

Elevation: Tokens

Icons: Overview

Icons: Designing icons

Icons: Applying icons

Motion

Motion physics system: How it works

Motion physics system: Specs

Easing and duration: Applying easing and duration

Easing and duration: Tokens & specs

Transitions: Transition patterns

Transitions: Applying transitions

Shape: Overview & principles

Shape: Corner radius scale

Shape: Shape morph

Spacing: Overview

Spacing: Applying spacing

Spacing: Tokens

Typography: Overview

Typography: Fonts

Typography: Type scale & tokens

Typography: Applying type

Typography: Editorial treatments

Components

App bars: Overview

App bars: Specs

App bars: Guidelines

App bars: Accessibility

Badges: Overview

Badges: Specs

Badges: Guidelines

Badges: Accessibility

Buttons

All buttons

Button groups: Overview

Button groups: Specs

Button groups: Guidelines

Button groups: Accessibility

Buttons: Overview

Buttons: Specs

Buttons: Guidelines

Buttons: Accessibility

Extended FABs: Overview

Extended FABs: Specs

Extended FABs: Guidelines

Extended FABs: Accessibility

FAB menu: Overview

FAB menu: Specs

FAB menu: Guidelines

FAB menu: Accessibility

FABs: Overview

FABs: Specs

FABs: Guidelines

FABs: Accessibility

Icon buttons: Overview

Icon buttons: Specs

Icon buttons: Guidelines

Icon buttons: Accessibility

Segmented buttons: Overview

Segmented buttons: Specs

Segmented buttons: Guidelines

Segmented buttons: Accessibility

Split button: Overview

Split button: Specs

Split button: Guidelines

Split button: Accessibility

Cards: Overview

Cards: Specs

Cards: Guidelines

Cards: Accessibility

Carousel: Overview

Carousel: Specs

Carousel: Guidelines

Carousel: Accessibility

Checkbox: Overview

Checkbox: Specs

Checkbox: Guidelines

Checkbox: Accessibility

Chips: Overview

Chips: Specs

Chips: Guidelines

Chips: Accessibility

Date & time pickers

Date pickers: Overview

Date pickers: Specs

Date pickers: Guidelines

Date pickers: Accessibility

Time pickers: Overview

Time pickers: Specs

Time pickers: Guidelines

Time pickers: Accessibility

Dialogs: Overview

Dialogs: Specs

Dialogs: Guidelines

Dialogs: Accessibility

Divider: Overview

Divider: Specs

Divider: Guidelines

Divider: Accessibility

Lists: Overview

Lists: Specs

Lists: Guidelines

Lists: Accessibility

Loading & progress

Loading indicator: Overview

Loading indicator: Specs

Loading indicator: Guidelines

Loading indicator: Accessibility

Progress indicators: Overview

Progress indicators: Specs

Progress indicators: Guidelines

Progress indicators: Accessibility

Menus: Overview

Menus: Specs

Menus: Guidelines

Menus: Accessibility

Navigation

Navigation bar: Overview

Navigation bar: Specs

Navigation bar: Guidelines

Navigation bar: Accessibility

Navigation drawer: Overview

Navigation drawer: Specs

Navigation drawer: Guidelines

Navigation drawer: Accessibility

Navigation rail: Overview

Navigation rail: Specs

Navigation rail: Guidelines

Navigation rail: Accessibility

Radio button: Overview

Radio button: Specs

Radio button: Guidelines

Radio button: Accessibility

Search: Overview

Search: Specs

Search: Guidelines

Search: Accessibility

Sheets

Bottom sheets: Overview

Bottom sheets: Specs

Bottom sheets: Guidelines

Bottom sheets: Accessibility

Side sheets: Overview

Side sheets: Specs

Side sheets: Guidelines

Side sheets: Accessibility

Sliders: Overview

Sliders: Specs

Sliders: Guidelines

Sliders: Accessibility

Snackbar: Overview

Snackbar: Specs

Snackbar: Guidelines

Snackbar: Accessibility

Switch: Overview

Switch: Specs

Switch: Guidelines

Switch: Accessibility

Tabs: Overview

Tabs: Specs

Tabs: Guidelines

Tabs: Accessibility

Text fields: Overview

Text fields: Specs

Text fields: Guidelines

Text fields: Accessibility

Toolbars: Overview

Toolbars: Specs

Toolbars: Guidelines

Toolbars: Accessibility

Tooltips: Overview

Tooltips: Specs

Tooltips: Guidelines

Tooltips: Accessibility

On this page

Loading indicator: Guidelines ​

Loading indicators show the progress of a process for a short wait time


Loading indicators are best for indicating a short, indeterminate wait time

Usage ​

Loading indicators use animation to grab attention, mitigate perceived latency, and indicate that an activity is in progress.

They should be used when progress isn’t detectable, or when it’s not necessary to indicate how long an activity will take.

While similar in function to circular progress indicators, loading indicators are a better alternative for short processes between 200ms and 5s.

Use a loading indicator when a background process is running

Choose a loading or progress indicatorProgress indicators show the status of a process in real time.More on progress indicators that corresponds to the expected wait time and type of process.

If the wait is very long, consider allowing users to navigate away from the page while the process finishes up.

Expected wait timeRecommendation
Instant (under 200ms)No indicator
Short (between 200ms and 5s)Loading indicator
Long (Over 5s)Progress indicator
Instant (under 200ms): Display the content immediately
Short (between 200ms and 5s): Use a loading indicator
Long (over 5s): Use a progress indicator

When a process can transition from indeterminate (unknown progress) to determinate (known remaining progress), transition between the corresponding progress indicators.

Don’t transition a loading indicator into a progress indicator.

Do Transition from an indeterminate progress indicator to a determinate progress indicator
Don't Avoid transitioning from a loading indicator to a determinate progress indicator

Anatomy ​

2 parts of an active indicator.
  1. Active indicator
  2. Container (optional)

Active indicator

The active indicator is a looping shape morph sequence composed of seven unique Material 3 shapes.

More about the Material shape library

Active indicator with shape morph.
The active indicator morphs shape to capture attention

Container (optional)

When the container is visible, the active indicator should change color from primary to on-primary-container.

The container should be visible when the loading indicator is placed over other content. This helps it stand out better by giving it a stronger contrast. It’s not needed when the loading indicator is placed directly on a surface.

The container should be used with pull-to-refresh behavior.

Active indicator with container.
The container is a circle that provides extra contrast from body content

Placement ​

While loading a page or container, the loading indicator should be centered on the element.

Center the loading indicator in the middle of the page or container

When loading more items on a page with existing content, place the loading indicator in the empty space where the new content will appear. Avoid overlapping existing content.

Center the loading indicator in the empty space where content will appear

Loading indicators can be placed within other components, such as buttonsButtons let people take action and make choices with one tap.More on buttons, to indicate that the action is ongoing, such as validating a form or checking for updates.

Loading indicators can be placed in buttons that take a few seconds to take effect
Use loading indicators to show progress without taking up much space

Responsive layout ​

Loading indicators default to 48dp, but the size is flexible. It should be between 24dp to 240dp, depending on the placement and the breakpoint. Avoid exceeding the minimum and maximum sizes.

The ratio between the container and the active indicator stays the same when resizing the loading indicator.

Reserve very large progress indicators for large and extra-large windows, like desktop.
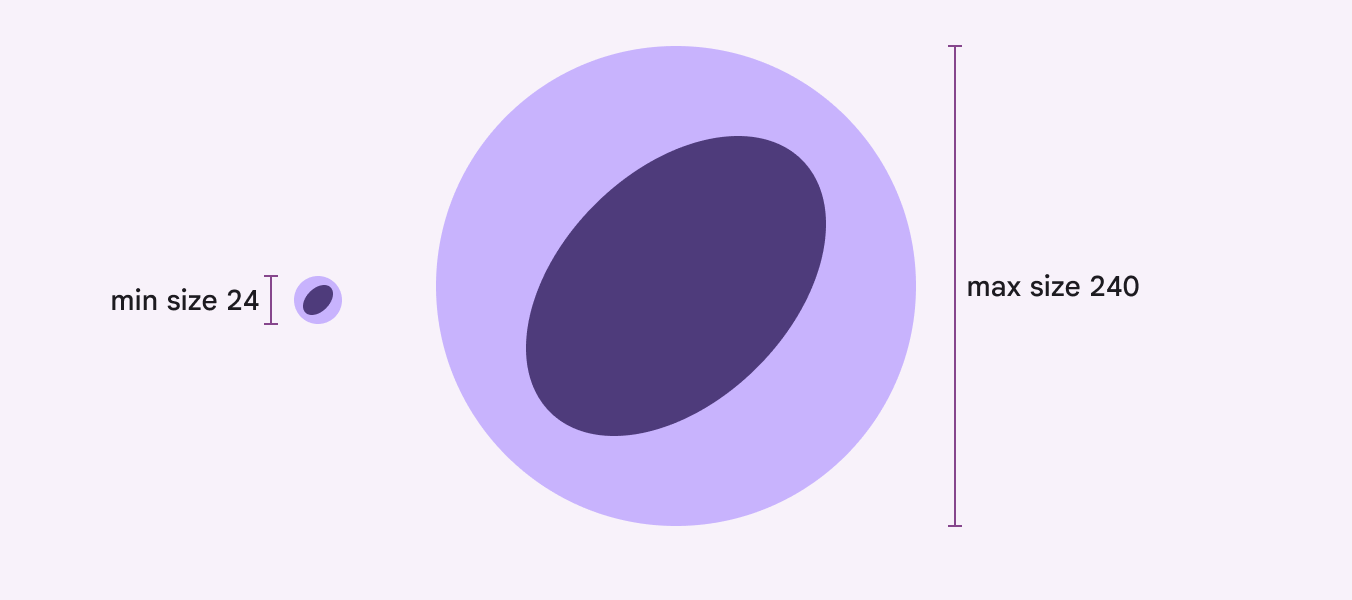
Loading indicators can range from 24dps to 240dps.
Loading indicators can range in size from 24–240dp

Larger windows

As the pane or window size grows, consider scaling the loading indicator as well, so it remains proportional in size to the empty space around it. The loading indicator shouldn’t exceed 240dp.

The loading indicator’s default size is ideal for mobile and other compact windows. The loading indicator should scale up in larger windows.

Behavior ​

Pull-to-refresh

The loading indicator is used in pull-to-refresh on Jetpack Compose only.

Pull-to-refresh is an Android system feature that manually refreshes screen content with an action or gesture. It’s used at the beginning of lists, grid lists, and card collections where the most recent content appears.

It’s best to use pull-to-refresh with dynamic content that can have frequent updates, where people have a high chance of seeing new content after refreshing.

The loading indicator for pull-to-refresh can appear on top of the content or adjacent to it

Threshold requirements

To ensure intentional usage of the pull-to-refresh gesture, the loading indicator must pass a threshold before the app will refresh.

After passing the threshold, completing the gesture initiates a refresh
Reversing the gesture past the threshold will cancel the refresh action

The loading indicator remains visible until the refresh activity completes and any new content is visible, or someone navigates away from the refreshing content.

Do Keep the loading indicator in view until the activity is completed to provide status of the refresh activity
Don't Don’t scroll the loading indicator off-screen, as it hides the status of the refresh activity. It could imply that the refresh activity is associated with a specific component, such as a card, instead of the entire screen.
Pager
Previous pageLoading indicator: Specs
Next pageLoading indicator: Accessibility

Released under the Apache 2.0 or CC BY 4.0

Copyright © 2018-Present Google

https://m3.material.io/components/loading-indicator/guidelines

Released under the Apache 2.0 or CC BY 4.0

Copyright © 2018-Present Google