Skip to content
Material Design 3
Main Navigation
v3
v2
v1

English

简体中文
繁體中文
Español
Français
Русский
Português – Brasil
Deutsch
日本語
한국어
Italiano
Polski
Türkçe
čeština
magyar

English

简体中文
繁體中文
Español
Français
Русский
Português – Brasil
Deutsch
日本語
한국어
Italiano
Polski
Türkçe
čeština
magyar

Appearance

Sidebar Navigation

Foundations

Accessibility

Overview: Principles

Overview: Assistive technology

Designing: Overview

Designing: Color contrast

Designing: Structure

Designing: Flow

Designing: Elements

Writing and text: Best practices

Writing and text: Text truncation

Writing and text: Text resizing

Building for all: User needs

Building for all: Co-design

Content design

Overview

Alt text

Global writing: Overview

Global writing: Word choice

Notifications

Style guide: UX writing best practices

Style guide: Word choice

Style guide: Grammar and punctuation

Customizing Material

Devices

Watches: Overview

Watches: Foundations

Watches: Styles

Watches: Layout

XR

Design: Overview

Design: Interaction

Design: Layout

Design: Accessibility

Components: Overview

Components: App bars

Components: Dialogs

Components: Nav bar

Components: Nav rail

Components: Toolbars

Design tokens: Overview

Design tokens: How to use tokens

Interaction

Gestures

Inputs

Selection

States: Overview

States: State layers

States: Applying states

Layout

Overview: Overview

Overview: Parts of layout

Overview: Adaptive design

Scaffold: Overview

Scaffold: Bars

Scaffold: Rails

Scaffold: Panes

Grids & spacing: Overview

Grids & spacing: Grids

Grids & spacing: Spacing

Grids & spacing: Density

Breakpoints: Overview

Breakpoints: Compact

Breakpoints: Medium

Breakpoints: Expanded

Breakpoints: Large & extra-large

Bidirectionality & RTL

Canonical examples: Overview

Canonical examples: Feed

Canonical examples: List-detail

Canonical examples: Supporting pane

Usability: Overview

Usability: Applying M3 Expressive

Material A-Z

Styles

Color

Color system: Overview

Color system: How the system works

Color roles

Color schemes

Choosing a scheme

Static: Baseline

Static: Custom brand

Dynamic: Choosing a source

Dynamic: User-generated source

Dynamic: Content-based source

Advanced: Overview

Advanced: Apply colors

Advanced: Define new colors

Advanced: Adjust existing colors

Color resources

Elevation: Overview

Elevation: Applying elevation

Elevation: Tokens

Icons: Overview

Icons: Designing icons

Icons: Applying icons

Motion

Motion physics system: How it works

Motion physics system: Specs

Easing and duration: Applying easing and duration

Easing and duration: Tokens & specs

Transitions: Transition patterns

Transitions: Applying transitions

Shape: Overview & principles

Shape: Corner radius scale

Shape: Shape morph

Spacing: Overview

Spacing: Applying spacing

Spacing: Tokens

Typography: Overview

Typography: Fonts

Typography: Type scale & tokens

Typography: Applying type

Typography: Editorial treatments

Components

App bars: Overview

App bars: Specs

App bars: Guidelines

App bars: Accessibility

Badges: Overview

Badges: Specs

Badges: Guidelines

Badges: Accessibility

Buttons

All buttons

Button groups: Overview

Button groups: Specs

Button groups: Guidelines

Button groups: Accessibility

Buttons: Overview

Buttons: Specs

Buttons: Guidelines

Buttons: Accessibility

Extended FABs: Overview

Extended FABs: Specs

Extended FABs: Guidelines

Extended FABs: Accessibility

FAB menu: Overview

FAB menu: Specs

FAB menu: Guidelines

FAB menu: Accessibility

FABs: Overview

FABs: Specs

FABs: Guidelines

FABs: Accessibility

Icon buttons: Overview

Icon buttons: Specs

Icon buttons: Guidelines

Icon buttons: Accessibility

Segmented buttons: Overview

Segmented buttons: Specs

Segmented buttons: Guidelines

Segmented buttons: Accessibility

Split button: Overview

Split button: Specs

Split button: Guidelines

Split button: Accessibility

Cards: Overview

Cards: Specs

Cards: Guidelines

Cards: Accessibility

Carousel: Overview

Carousel: Specs

Carousel: Guidelines

Carousel: Accessibility

Checkbox: Overview

Checkbox: Specs

Checkbox: Guidelines

Checkbox: Accessibility

Chips: Overview

Chips: Specs

Chips: Guidelines

Chips: Accessibility

Date & time pickers

Date pickers: Overview

Date pickers: Specs

Date pickers: Guidelines

Date pickers: Accessibility

Time pickers: Overview

Time pickers: Specs

Time pickers: Guidelines

Time pickers: Accessibility

Dialogs: Overview

Dialogs: Specs

Dialogs: Guidelines

Dialogs: Accessibility

Divider: Overview

Divider: Specs

Divider: Guidelines

Divider: Accessibility

Lists: Overview

Lists: Specs

Lists: Guidelines

Lists: Accessibility

Loading & progress

Loading indicator: Overview

Loading indicator: Specs

Loading indicator: Guidelines

Loading indicator: Accessibility

Progress indicators: Overview

Progress indicators: Specs

Progress indicators: Guidelines

Progress indicators: Accessibility

Menus: Overview

Menus: Specs

Menus: Guidelines

Menus: Accessibility

Navigation

Navigation bar: Overview

Navigation bar: Specs

Navigation bar: Guidelines

Navigation bar: Accessibility

Navigation drawer: Overview

Navigation drawer: Specs

Navigation drawer: Guidelines

Navigation drawer: Accessibility

Navigation rail: Overview

Navigation rail: Specs

Navigation rail: Guidelines

Navigation rail: Accessibility

Radio button: Overview

Radio button: Specs

Radio button: Guidelines

Radio button: Accessibility

Search: Overview

Search: Specs

Search: Guidelines

Search: Accessibility

Sheets

Bottom sheets: Overview

Bottom sheets: Specs

Bottom sheets: Guidelines

Bottom sheets: Accessibility

Side sheets: Overview

Side sheets: Specs

Side sheets: Guidelines

Side sheets: Accessibility

Sliders: Overview

Sliders: Specs

Sliders: Guidelines

Sliders: Accessibility

Snackbar: Overview

Snackbar: Specs

Snackbar: Guidelines

Snackbar: Accessibility

Switch: Overview

Switch: Specs

Switch: Guidelines

Switch: Accessibility

Tabs: Overview

Tabs: Specs

Tabs: Guidelines

Tabs: Accessibility

Text fields: Overview

Text fields: Specs

Text fields: Guidelines

Text fields: Accessibility

Toolbars: Overview

Toolbars: Specs

Toolbars: Guidelines

Toolbars: Accessibility

Tooltips: Overview

Tooltips: Specs

Tooltips: Guidelines

Tooltips: Accessibility

On this page

Carousel: Accessibility ​

Carousels show a collection of items that can be scrolled on and off the screen

Use cases ​

People should be able to do the following using assistive technology:

  • Navigate to the carousel container
  • Navigate between different carousel items
  • Activate a carousel item
  • Skip over the carousel items

Requirements on scrolling pages ​

On vertically-scrolling pages, carousels require an accessible way to view all the items without horizontally scrolling. (This requirement doesn't apply to full-screen carouselsThe full-screen carousel layout shows one edge-to-edge large item at a time and scrolls vertically..)

Material recommends adding a Show all button below the carousel, which opens a dedicated vertically-scrolling page of all carousel items.
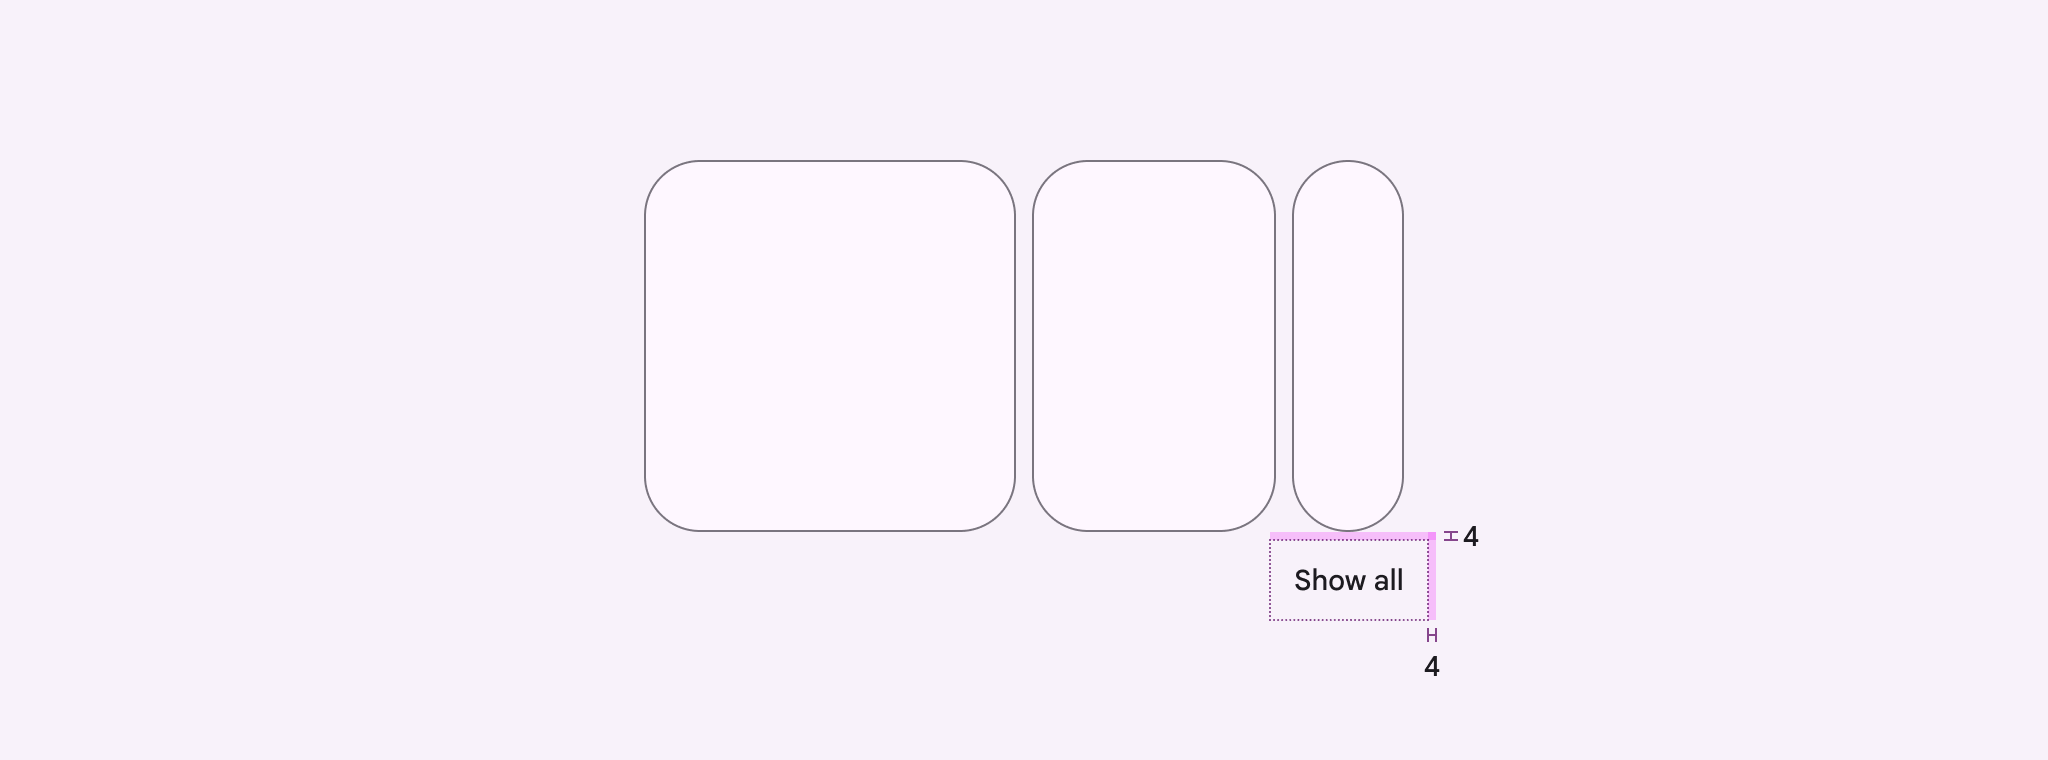
Carousels without headers should use a Show all button to view all carousel items
Measurements of a "show all" button added below a carousel.
The Show all button should have a padding of 4dp

If the carousel has a header, you can use an arrow icon button instead. Place the arrow icon directly next to the header or in the same row.

Make sure the header is also displayed on the page of all carousel items.
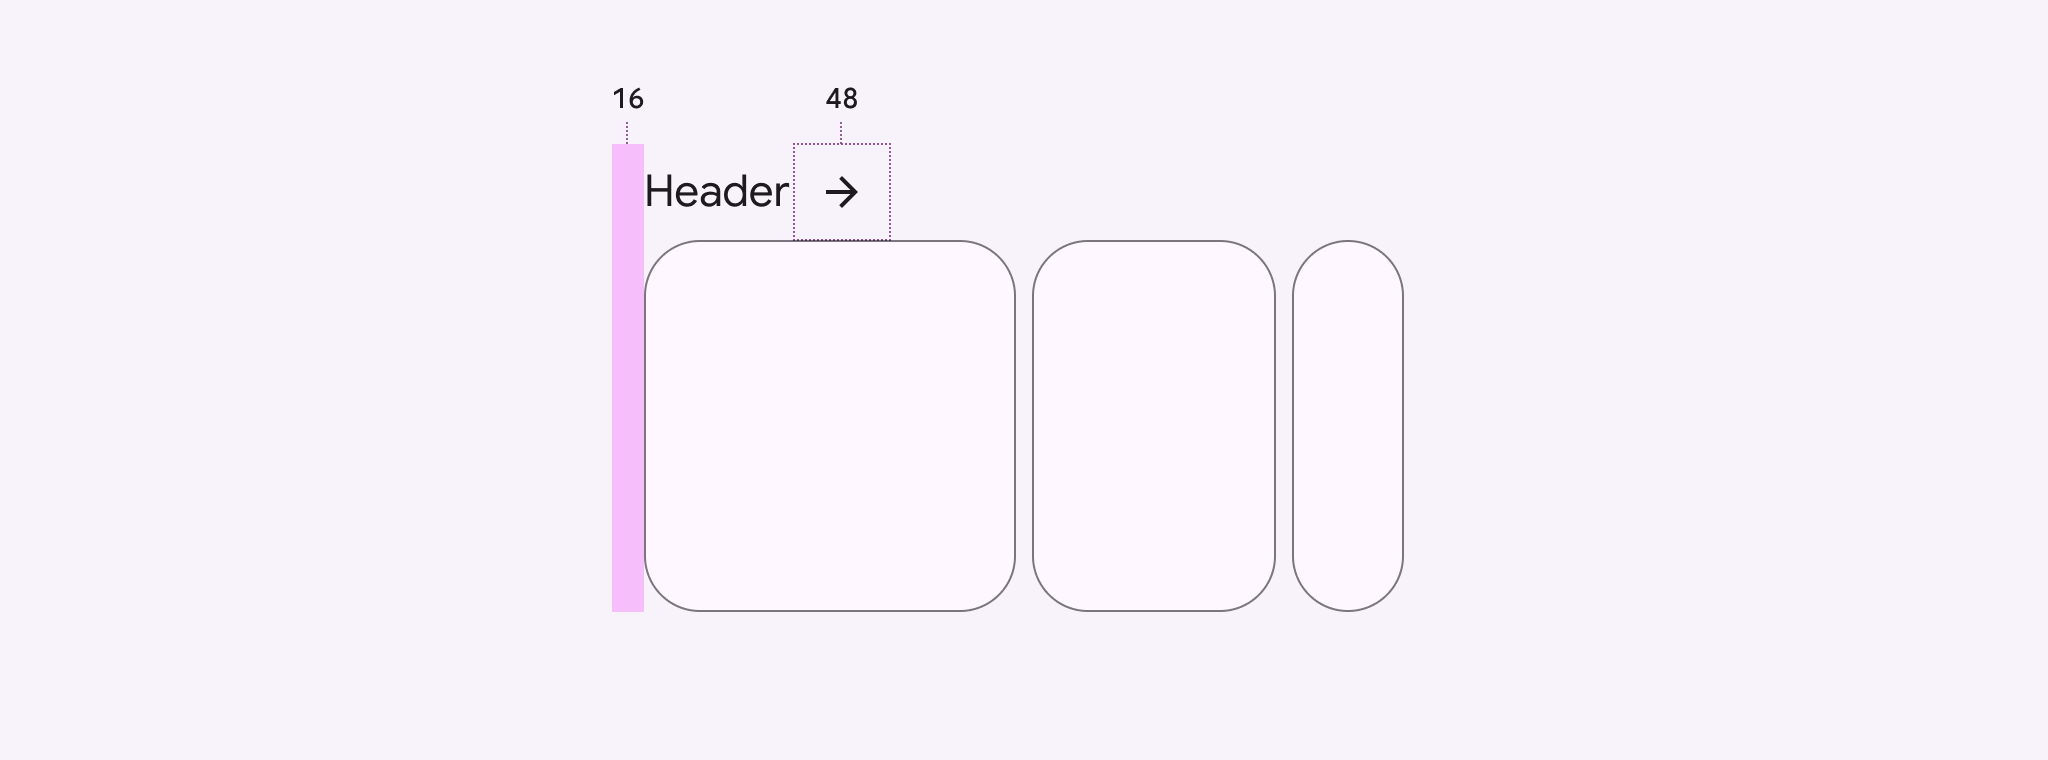
Carousels with headers should use an arrow to view all carousel items
Measurements of an arrow icon button added next to a carousel header.
Headers should align with the leading edge, and the arrow icon should have a size of 48dp

Avoid customizing the accessibility solution when possible. However, if your product needs an alternative solution, consider adding a Show all button in nearby navigation, or add alternative control buttons close to the carousel.

Avoid adding UI elements, like arrows or other icons, within or beside the carousel.
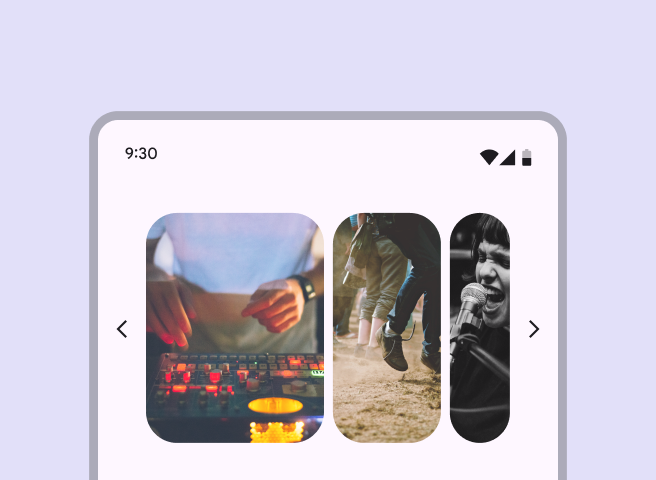
Arrow icons on the left and right of the carousel, reducing container width.
Don’t Avoid adding buttons into the carousel container or beside it. Place any buttons above or below the carousel.
Arrow icons floating on top of the carousel edge, concealing items.
Don’t Don't cover the carousel with buttons or other UI

Interaction & style ​

Touch

Tapping on a carousel item changes the shape slightly, and creates a touch ripple for interaction feedback.

Touch: Tap

Cursor

The hover stateA hover state communicates when a user has placed a cursor above an interactive element.More on hover state provides a visual cue that the carousel item is interactive.

When the carousel item is clicked (in both active and inactive states), a ripple appears for interaction feedback.

Cursor: Hover, click

Initial focus

When navigating to a carousel using assistive technology, use Tab to place initial focus on the first carousel item. Then, use Tab or the arrow keys to navigate the carousel items.

Use the up and down arrow keys to leave the carousel and focus on the next element on the page, like the Show all button.
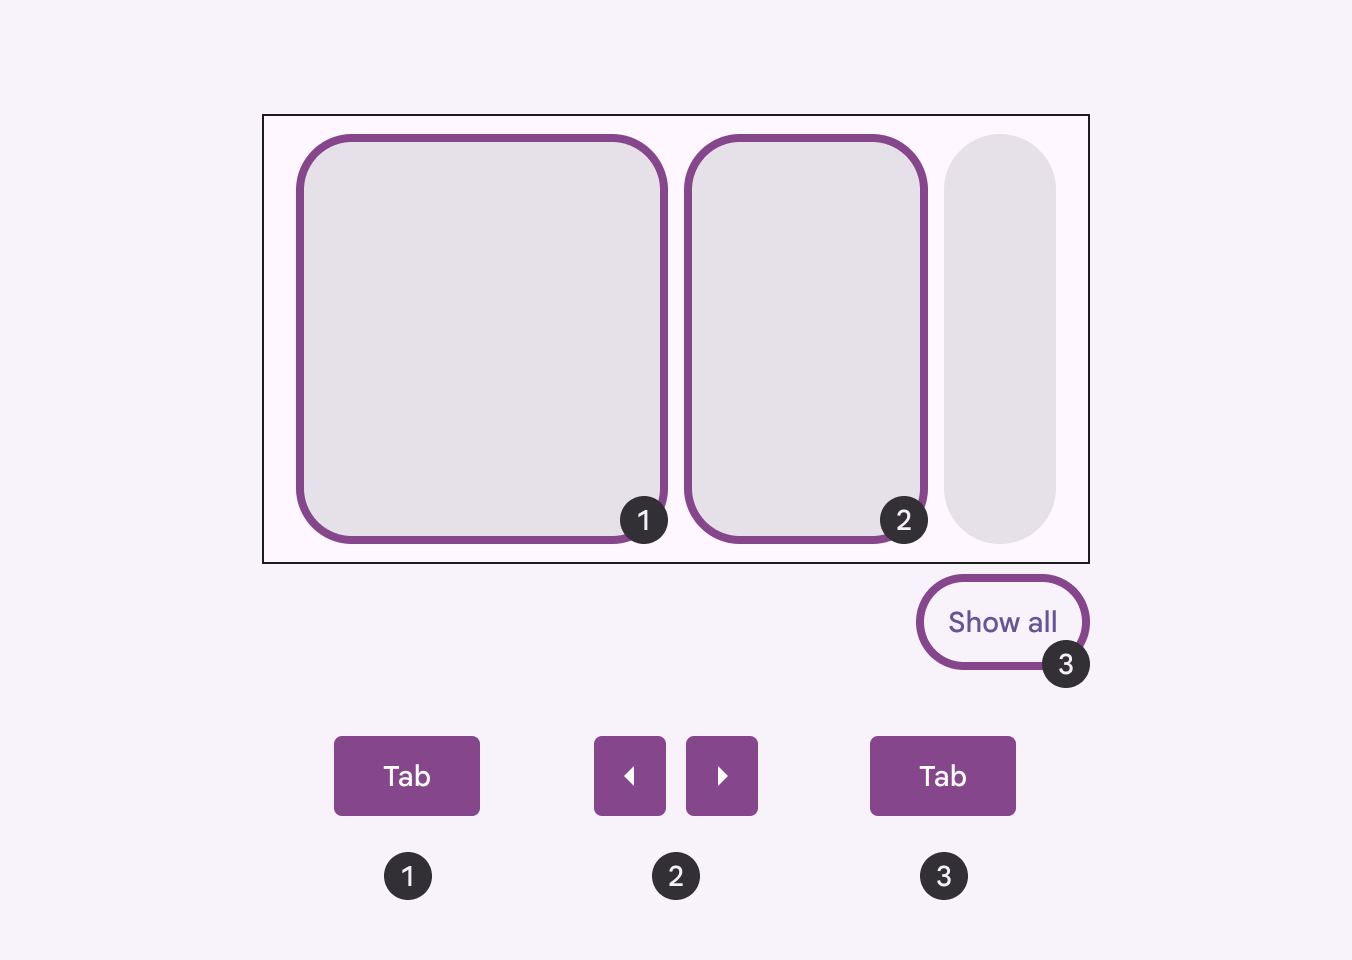
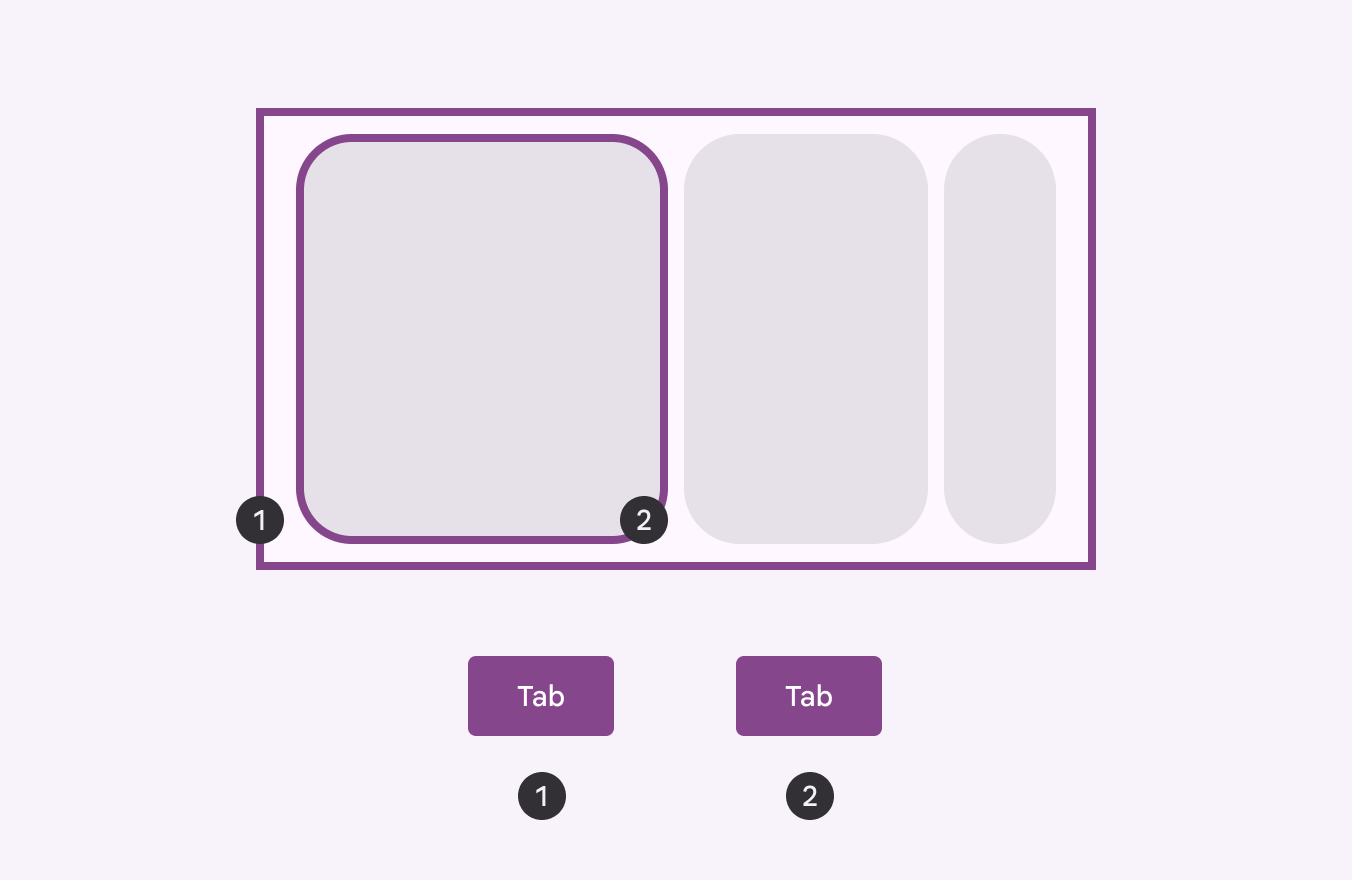
Diagram of how to navigate a carousel using assistive technology.
Do Set initial focus on the first carousel item, and use arrows to navigate items
Diagram of how not to navigate a carousel using assistive technology.
Don’t Avoid focusing on the carousel container

Keyboard navigation ​

KeysActions
Tab or ArrowsMoves to the previous or next carousel item
Space or EnterActivates the focusedA focused state communicates when a user has highlighted an element, using an input method such as a keyboard or voice.More on focused state carousel item

Labeling elements ​

The carousel container has the container role.
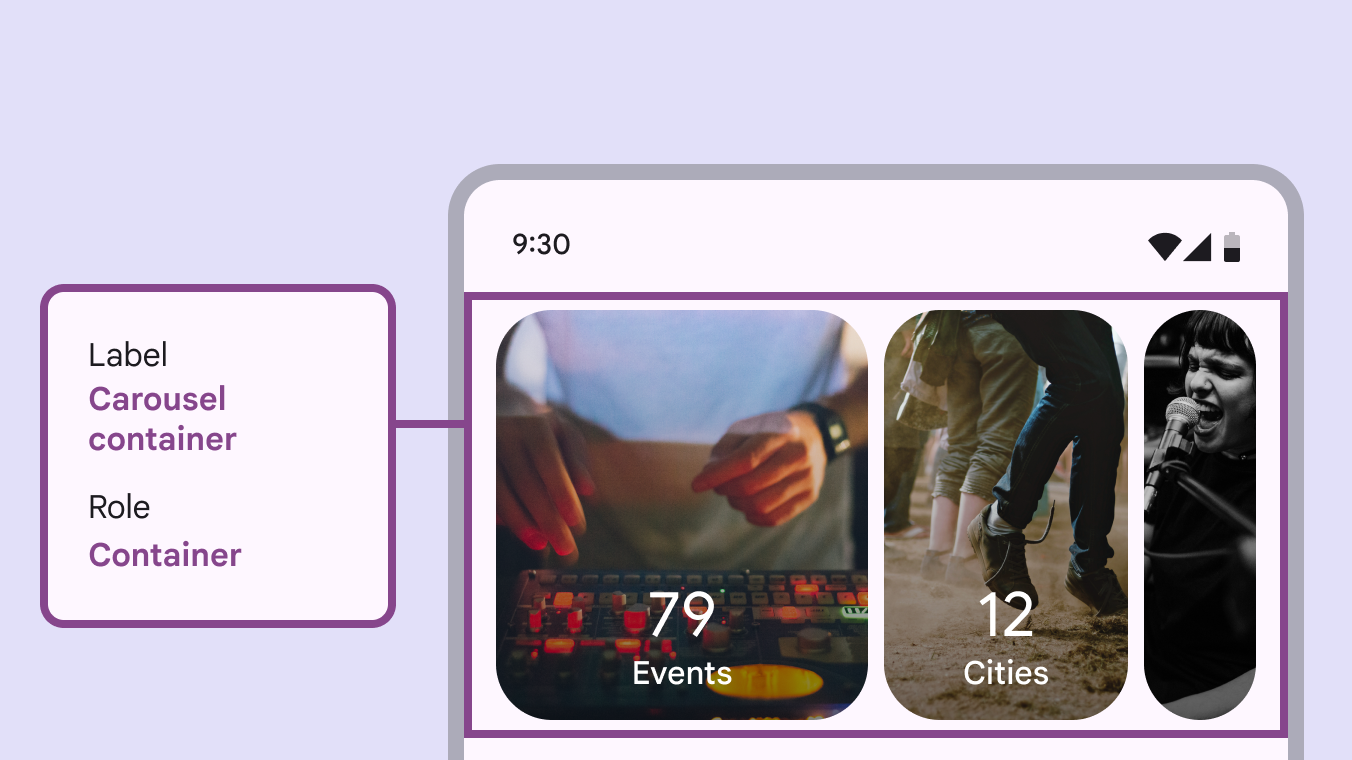
Accessibility labels of a carousel.
The carousel container is labelled appropriately and has the container role

Each carousel may have a different number of items, so the label reads out the total amount of items and the current item in focus.
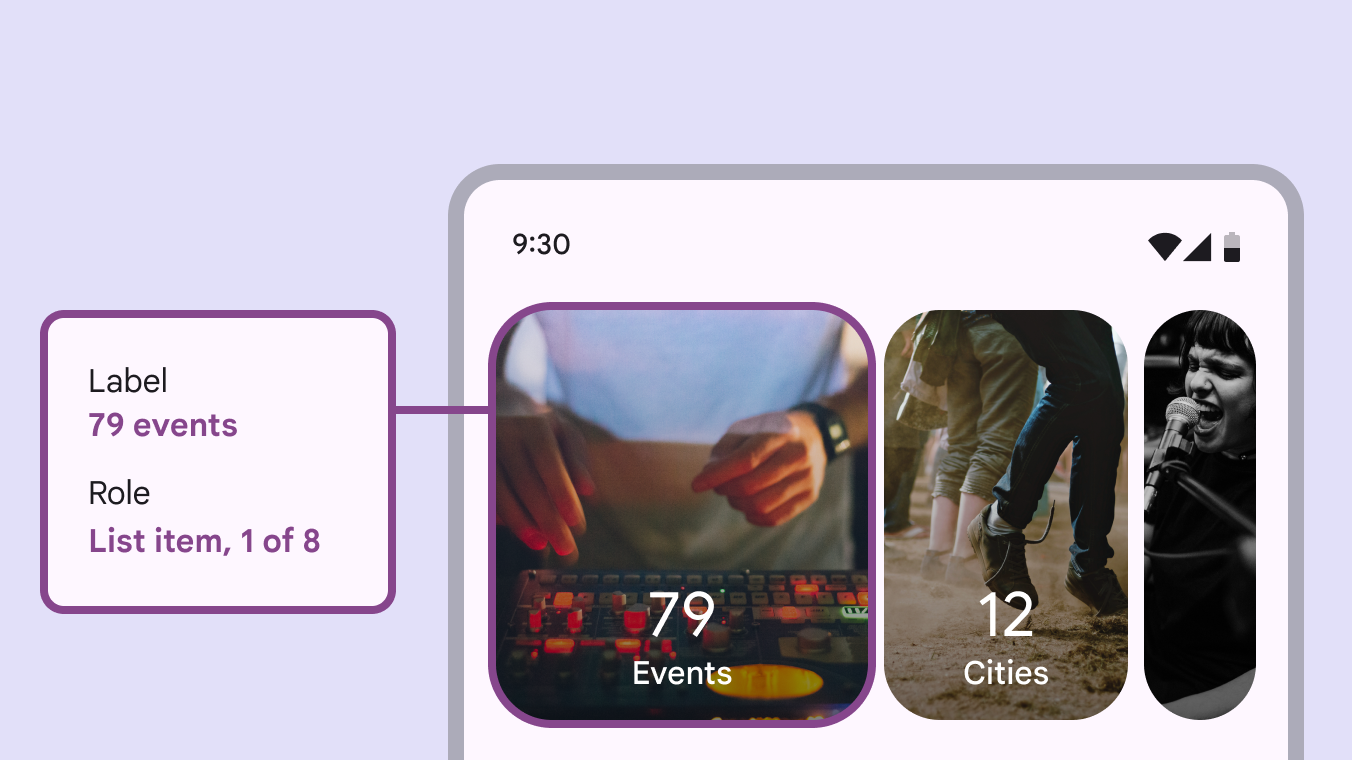
Accessibility labels of a carousel item.
The carousel item label indicates the current item in focus and the total number of items

Reduced motion ​

When reduced motion settings are turned on, the parallax effect should be removed and carousel items should no longer expand as they come into view. All items are the same size.

Make sure carousels with reduced motion reach the edges of the window to avoid clipping visuals.

  1. Default carousel for multi-scroll
  2. Carousel with reduced motion settings turned on

For hero carouselsThe hero carousel layout shows at least one large and one small item at a time. with reduced motion, the small carousel item is only partially shown on screen.

  1. Default carousel for single-scroll
  2. Carousel with reduced motion settings turned on
Pager
Previous pageCarousel: Guidelines
Next pageCheckbox: Overview

Released under the Apache 2.0 or CC BY 4.0

Copyright © 2018-Present Google

https://m3.material.io/components/carousel/accessibility

Released under the Apache 2.0 or CC BY 4.0

Copyright © 2018-Present Google